title: node实现一个Web服务框架 date: 2022-02-23 14:29:28 updated: 2022-02-23 14:29:28 photos:
- https://img.yzmblog.top/blog/Tl6NXEnaTImyem5bP8P9BlLyo1uundefined.png tags:
- node
- JavaSvript categories:
- 前端
- Web excerpt: 使用过node开发web服务系统的同学通常会使用一些web服务框架。想要知道这些web服务框架是怎么实现的吗?现在就让我们来一起学习一下吧!
使用过node开发web服务系统的同学通常会使用一些web服务框架,例如:express,koa,egg.js等。
想要知道这些web服务框架是怎么实现的吗?在这里将会带你一步一步实现一个web服务端的框架。现在就让我们来一起学习一下吧!
基础知识
node.js中实现http服务主要是用node内置的http和http2库,http库提供了请求和服务端创建功能,使用http库可以很简单地创建一个web服务。
import http from 'http'
const app = http.createServer((req, res) => {
    if (req.url === '/') {
        res.send('hello world')
        res.end()
    } else {
        res.send('')
        res.end()
    }
})
app.listen('9988', () => {
    console.log('server running at 9988')
})
可以看到在node中只需要几行代码就能开启一个http服务,但是我们会发现直接调用服务的时候会有一个问题:
- 每一个用户访问时,都会调用createServer中的回调函数,当业务逻辑逐渐复杂的时候,回调函数逐渐变得臃肿而难以维护。
如果我们有一个框架,可以帮我们解决url分析,页面参数提取,post参数提取,路由等方法,拿我们的开发效率肯定会提高很多!那我们现在一起实现这个框架吧~
HTTP服务
功能分析
整理一下需求
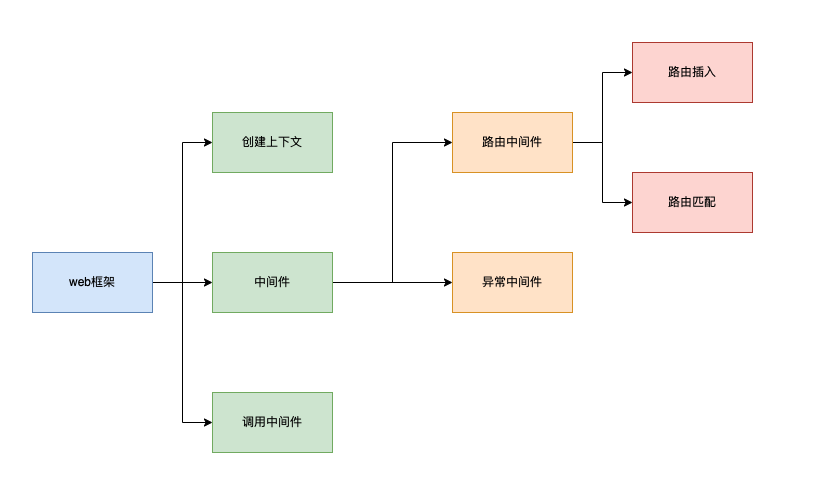 上图就是我们的框架需要实现功能
首先我们需要创建一个Server类,server类提供的是最基本的服务:请求捕捉,封装上下文和触发中间件。
中间件是实现业务逻辑的插件,类似webpack的插件服务一样,当请求进入web服务时就会触发中间件。
所以Server类需要提供最基本的方法:
init: 实例初始化,创建http实例use: 向实例添加中间件listen: 启动web服务createContext:封装上下文runMiddleWare:调用中间件
初始化
初始化需要创建一个HttpFramework类并实现init和listen方法。init是私有方法,会在构造器中调用,代码如下:
import http from 'http';

interface HttpFrameworkMethods {
  /** 向实例添加中间件 */
  use: (func: middleWareFunc) => void;
  /** 启动web服务 */
  listen: (...data: ListenOption) => void;
}

/** 监听服务方法传入参数 */
type ListenOption = [port: number, callback: () => void];

/** Http框架类 */
class HttpFramework implements HttpFrameworkMethods {
  /** http服务实例 */
  private serverApp: http.Server | null;
  /** 中间件列表 */
  private middleWareArr: middleWareFunc[];
  constructor() {
    this.serverApp = null;
    this.middleWareArr = [];
    this.init();
  }

  /** 初始化 */
  private init() {
    const app = http.createServer((req, res) => {

    });
    this.serverApp = app;
  }

  /** 插入中间件 */
  use() {}

  listen(port: number, callback: () => void = () => {}) {
    this.serverApp?.listen(port, callback);
  }
}

export default HttpFramework;
此时已经实现了一个基本的架构,我们实例化之后就可以调用listen来开启web服务
const app = new HttpFramework()
app.listen('9988', () => {
    console.log('server running at 9988')
})

// server running at 9988
创建上下文
接下来需要给回调函数构造一个上下文,实现:url分析,页面参数提取的功能
首先定义一下上下文的类型
type PickRequestOptionKey = 'method';
type requestOption<T extends Record<string, any> = {}> = {
  _req: http.IncomingMessage;
  headers: http.IncomingHttpHeaders;
  fullPath: string;
  pathName: string;
  query: Record<string, any>;
} & Pick<http.IncomingHttpHeaders, PickRequestOptionKey> &
  T;

type PickResponseOptionKey = 'statusCode' | 'end' | 'setHeader';
type responseOption = {
  _res: http.ServerResponse;
  send: (chunk: string | Buffer) => boolean;
} & Pick<http.ServerResponse, PickResponseOptionKey>;
可以看到,上下文需要定义requestOption和responseOption分别对应的是请求进入和请求响应的上下文。
在请求进入时,我们把进行URL分析,将页面参数和请求地址分离,除此之外,还把源请求实例都放入上下文中。
代码实现如下
// 创建上下文
function createContext(req: http.IncomingMessage, res: http.ServerResponse) {
  const { method, url, headers } = req;
  const { statusCode, write, end, setHeader } = res;
  const [pathName, query] = (url || '').split('?');
  const queryObj: Record<string, any> = {};
  if (query) {
    const queryArr = query.split('&');
    queryArr.forEach((val) => {
      const [key, value] = decodeURIComponent(val).split('=');
      if (key) queryObj[key] = value;
    });
  }
  const reqOption: requestOption = {
    _req: req,
    method: method,
    pathName,
    query: queryObj,
    fullPath: url || '',
    headers,
  };

  const resOption: responseOption = {
    _res: res,
    statusCode,
    setHeader,
    send: write.bind(res),
    end: end.bind(res),
  };

  return {
    reqOption,
    resOption,
  };
}
编写完后在回调函数中调用该方法
/** 初始化 */
  private init() {
    const app = http.createServer((req, res) => {
      const { reqOption, resOption } = createContext(req, res);
    });
    this.serverApp = app;
  }
插入中间件
刚刚我们在创建HttpFramework类的时候定义了middleWareArr参数和use方法。
middleWareArr的作用是保存插入的中间件。use方法则是插入中间件方法。
use方法很简单,只需要将传入的中间件存到middleWareArr中即可
type nextTickFunc = () => Promise<any>;

type middleWareFunc<K extends Record<string, any> = {}> = (
  req: requestOption<K>,
  res: responseOption,
  next: nextTickFunc
) => void;

use(callback: middleWareFunc<any>) {
    if (typeof callback !== 'function') {
      throw new Error('middle ware must be a function');
    }
    this.middleWareArr.push(callback);
}
可以看到中间件传入了三个参数,req,res和next,req,res是刚刚创建的上下文属性,next则是整个中间件系统中非常重要的一步, 这里参考了koa的洋葱模型
洋葱模型
洋葱模型可以简单地用一张图来描述
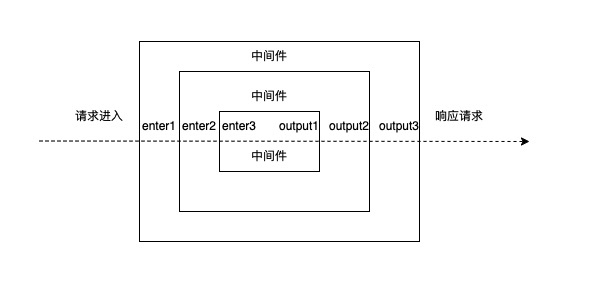
一次定义了三个中间件(最外层的是最先插入的中间件),当请求进入时,先执行最外层的中间件,然后执行第二层的,以此类推。
当执行到最后一个中间件后,就会一次执行中间件后的代码,例如在koa中:
import Koa from 'koa'

const app = new Koa()
app.use(async (ctx, next) => {
    console.log('1')
    await next();
    console.log('1')
})
app.use(async (ctx, next) => {
    console.log('2')
    await next();
    console.log('2')
})
app.use(async (ctx, next) => {
    console.log('3')
})
app.listen(8080)
代码会依次输出: 1 -> 2 -> 3 -> 2 -> 1
所以,中间件的作用就是:调用多个预先设置好的业务方法,在请求进入的时候递归地调用他们并输出。
调用中间件
上面我们一句实现了插入中间件,接下来需要实现的是:当请求进入时,如何按顺序地调用插入的中间件。
这里使用了递归的方法去实现
/**
 * 执行中间件
 * @param middleWareArr
 * @param req
 * @param res
 * @param current
 */
async function runMiddleWare(
  middleWareArr: middleWareFunc[],
  req: requestOption,
  res: responseOption
) {
  if (middleWareArr.length === 0) {
    res.send('404 not found');
    res.end();
  }
  let current = 0;
  // 递归调用next函数
  async function next() {
    if (middleWareArr[current + 1]) {
      current++;
      await middleWareArr[current](req, res, next);
    }
  }
  // 入口
  await middleWareArr[0](req, res, next);
}
最后修改一下init.js
/** 初始化 */
 private init() {
   const app = http.createServer((req, res) => {
     const { reqOption, resOption } = createContext(req, res);
     // 调用中间件
     runMiddleWare(this.middleWareArr, reqOption, resOption);
   });
   this.serverApp = app;
 }
这样一个基本的Http框架就实现了,来测试一下:
const app = new HttpFramework();
app.use(async (req, res, next) => {
  try {
    await next();
  } catch (err) {
    console.log(err);
    res.send('error');
    res.end();
  }
});
app.use(async (req, res) => {
  res.send(req.fullPath);
  res.end();
});
app.listen(9988, () => {
  console.log('server running at 9988');
});
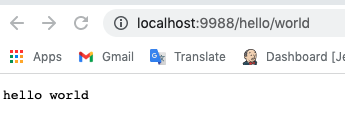
访问http://localhost:9988/hello/world后返回
路由中间件
上文已经实现了一个基本Web框架,但是他没有任何的业务实现。
接下来根据该框架来实现一个路由中间件,用来匹配路由去做对应业务逻辑
功能分析
也是一样,先来分析一下需要实现的功能:
添加路由:添加路由匹配规则路由匹配:根据请求进入的url匹配路由实例的规则动态路由:一个路由规则可以被多个url匹配并收集动态的参数
该中间件主要实现这三个功能,分析完功能后就开始编码吧~
初始化
首先定义中间件类的接口,确定类中需要实现的方法
interface AbstractRouter {
  // 路由合并
  use: (data: Router) => void;
  get: PublicRouteMethod;
  put: PublicRouteMethod;
  delete: PublicRouteMethod;
  post: PublicRouteMethod;
  option: PublicRouteMethod;
  set: (
    method: MethodList,
    path: PathMethod,
    businessFunc: BusinessFunc
  ) => void;
  routes: () => middleWareFunc<{ route: RouteParam }>;
}

type MethodList = 'GET' | 'POST' | 'PUT' | 'OPTION' | 'DELETE';
type PathMethod = string | RegExp;
type BusinessFunc = (
  req: requestOption<{ route: RouteParam }>,
  res: responseOption,
  next: nextTickFunc
) => void;

type PublicRouteMethod = (path: PathMethod, businessFunc: BusinessFunc) => void;

type RouterParam = {
  /** 前置路由 */
  prefix?: string;
};

type RouteParam = {
  method: MethodList;
  path: PathMethod;
  pathArr: string[];
  prefix?: string;
  businessFunc: BusinessFunc;
  param: Record<string, any>;
};
创建中间件类
class Router implements AbstractRouter {
  public routeList: RouteParam[];
  public data: RouterParam;
  constructor(data: RouterParam = {}) {
    this.routeList = [];
    this.data = data;
  }

  use(data: Router) {}
  set(method: MethodList, path: PathMethod, businessFunc: BusinessFunc) {}
  get(path: PathMethod, businessFunc: BusinessFunc) {}
  put(path: PathMethod, businessFunc: BusinessFunc) {}
  delete(path: PathMethod, businessFunc: BusinessFunc) {}
  post(path: PathMethod, businessFunc: BusinessFunc) {}
  option(path: PathMethod, businessFunc: BusinessFunc) {}

  /** 路由匹配 */
  routes() {}
}
路由添加
路由添加的方法很简单,只需要解析一下url,构造路由对象,然后插入到路由列表中。主要实现的是set方法,get,post等都是调用该方法
  set(method: MethodList, path: PathMethod, businessFunc: BusinessFunc) {
    let prefixArr: string[] = [];
    const pathArr =
      typeof path === 'string'
        ? path.split('/').filter((val) => val !== '')
        : [];
    if (this.data.prefix) {
      prefixArr = this.data.prefix.split('/').filter((val) => val !== '');
    }
    this.routeList.push({
      method,
      prefix: this.data.prefix,
      path: `${path}`,
      pathArr: prefixArr.concat(pathArr),
      businessFunc,
      param: {},
    });
  }

  get(path: PathMethod, businessFunc: BusinessFunc) {
    this.set('GET', path, businessFunc);
  }
  put(path: PathMethod, businessFunc: BusinessFunc) {
    this.set('PUT', path, businessFunc);
  }
  delete(path: PathMethod, businessFunc: BusinessFunc) {
    this.set('DELETE', path, businessFunc);
  }
  post(path: PathMethod, businessFunc: BusinessFunc) {
    this.set('POST', path, businessFunc);
  }
  option(path: PathMethod, businessFunc: BusinessFunc) {
    this.set('OPTION', path, businessFunc);
  }
路由匹配
路由匹配分两种情况:
- 正则匹配:如果匹配规则传入的是正则表达式,则直接使用正则匹配
- 字符串匹配:如果传入的是字符串,则将字符串分割后一级一级地匹配,这样做为了匹配到动态路由的参数。
如果路由匹配成功后,调用方法并立即退出匹配。
代码如下:
/** 路由匹配 */
routes() {
    return (
      req: requestOption<{ route: RouteParam }>,
      res: responseOption,
      next: nextTickFunc
    ) => {
      const url = req.pathName;
      const urlArr = url.split('/').filter((val) => val !== '');
      for (let item of this.routeList) {
        if (typeof item.path === 'string') {
          const param: Record<string, any> = {};
          const pathArr = item.pathArr;
          let isMatch = true;
          if (pathArr.length !== urlArr.length) continue;
          // 匹配路由
          for (let [key, val] of Object.entries(urlArr)) {
            let index = Number(key);
            if (/^\:.*$/.test(pathArr[index]) || val === pathArr[index]) {
              if (pathArr[index][0] === ':') {
                param[pathArr[index].substring(1, pathArr[index].length)] = val;
              }
            } else {
              isMatch = false;
              break;
            }
          }
          if (isMatch) {
            item.param = param;
            req.route = item;
            item.businessFunc(req, res, next);
            return;
          }
        // 正则匹配
        } else if (item.path.test(url)) {
          req.route = item;
          item.businessFunc(req, res, next);
          return;
        }
      }
      res.send('404 not found');
      res.end();
    };
}
写好之后插入到中间件
const app = new Server();
const router = new Router({ prefix: 'hello/' });

router.get('/:world/:hello', (req, res) => {
  console.log(req.route);
  res.send('hello world');
  res.end();
});

app.use(router.routes());

app.listen(9988, () => {
  console.log('server running at 9988');
});
运行服务后访问http://localhost:9988/hello/world

可以看到,动态路由可以正则匹配,并且动态路由参数也被记录下来了
总结
本文主要介绍了在node中如何实现一个web框架,主要讲了:
- node.js的http基础
- 构造一个Server框架
- 构造上下文
- 插入中间件
- 洋葱模型
- 调用中间件
- 根据Server框架编写了一个路由模块的中间件
- 路由定义
- 路由匹配
- 动态路由
想看源码的同学可以点击这里